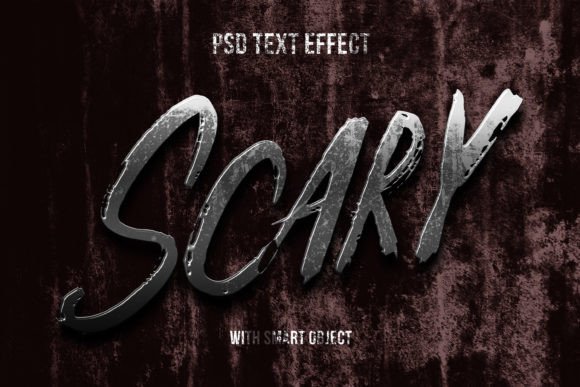
Mastering the Scary Halloween Text Effect Mockup for Professional Results
Halloween is a season where visual impact dictates success. Whether you are promoting a local haunted house, launching a seasonal product line, or simply designing a festive social media post, the typography you choose sets the immediate tone. A Scary Halloween Text Effect Mockup offers a streamlined solution to achieve high-quality, 3D typography without needing advanced modeling skills. However, many creators rush into using these resources without understanding the nuances of smart objects and layer management, leading to results that look generic or technically flawed. By approaching these tools with a critical eye and a clear workflow, you can elevate your designs from amateur experiments to professional-grade assets.
At its core, this graphic resource provides a pre-rendered environment where your text, shapes, or vector logos are automatically wrapped in a spooky, three-dimensional style. The appeal lies in efficiency; instead of spending hours crafting lighting, textures, and depth in a 3D program, you simply replace the content within a smart object. Yet, a common misunderstanding is treating these mockups as "one-click" miracles that require no design judgment. When users ignore the underlying structure, they often force incompatible elements into the template, resulting in distorted edges or illegible text that fails to communicate the intended message.
Avoiding Resolution and Quality Pitfalls
One of the most frequent errors involves overlooking resolution requirements before starting a project. Many beginners download a mockup, insert their logo, and only realize upon export that the image is pixelated or too small for their needs. The specific resource discussed here boasts a high resolution of 3000x2000 pixels, which is excellent for digital banners and even some print applications like flyers or t-shirts. However, if you attempt to stretch this beyond its intended limits or use it for large-format signage without checking the DPI settings, the quality will degrade rapidly.
To avoid this, always verify the dimensions relative to your final output medium. If you are creating a YouTube cover or a Facebook header, this resolution is more than sufficient. But for a physical t-shirt design or a large event poster, ensure you are working at 300 DPI within those pixel dimensions. A better approach is to plan your canvas size first. If the mockup feels slightly small for a massive billboard, consider using it as a texture element within a larger composition rather than the sole background, ensuring clarity remains sharp across all viewing distances.
The Smart Object Misconception
The power of this tool lies in its smart objects, yet this feature is also the source of significant confusion. A prevalent mistake is attempting to edit the text directly on the main canvas rather than opening the embedded smart object file. Users often try to type over the existing layers or use the text tool on the flattened preview, which yields no results and leads to frustration. The workflow requires you to locate the specific layer designated for editing, double-click the thumbnail to open the separate document, make your changes there, and then save.
Furthermore, not all content behaves well inside these 3D environments. While the mockup supports simple text, shapes, and vector logos, complex illustrations with fine details may get lost in the textured effects. For instance, a highly intricate vector logo might lose its definition when the scary 3D extrusion and lighting effects are applied. Before committing to a design, test a simplified version of your logo. If the details vanish, strip back the complexity or adjust the contrast within the smart object before saving. This proactive step saves time and ensures your branding remains recognizable even under heavy stylistic treatment.
Layer Organization and Workflow Efficiency
Efficiency in design is often dictated by how well you understand the file structure. This particular resource features well-organized layers and includes 100 editable options, providing immense flexibility. However, a lack of familiarity with Photoshop's layer panel can turn this advantage into a bottleneck. Users sometimes accidentally hide essential adjustment layers or modify the lighting masks, inadvertently breaking the realistic 3D illusion. The result is a flat-looking image that fails to leverage the depth the mockup was designed to provide.
To maintain the integrity of the effect, treat the adjustment layers and lighting groups as sacred unless you have specific reasons to alter them. If you need to change the color scheme to match your brand, do so by modifying the hue/saturation adjustment layers provided rather than painting over the text. This non-destructive method allows you to revert changes instantly if the new color clashes with the shadow work. Additionally, keep your smart object files named logically. If you are producing a series of banner promotions or greeting cards, naming your source files clearly prevents version control errors later in the process.
Choosing the Right Application for Your Project
Versatility is a key selling point, but applying the same effect to every context is a strategic error. A Scary Halloween Text Effect that works beautifully for a movie title or a cartoon title might be too aggressive for a subtle website element or a professional logo presentation. The heaviness of the 3D typography can overwhelm smaller UI elements or distract from the primary call to action in a marketing flyer. Context matters immensely.
Consider the platform and the audience. For Twitter covers or Instagram stories, bold and loud typography grabs attention quickly as users scroll. In these cases, maximizing the contrast and the "scary" factor is appropriate. Conversely, for a placard at an event or a clothing item meant for casual wear, legibility from a distance is paramount. You might need to simplify the background elements within the mockup or choose a cleaner font within the smart object to ensure the message reads clearly. Always preview your design in the actual environment where it will be displayed—whether that is a mobile screen or a printed handout—to gauge its effectiveness.
Making an Informed Decision Before Downloading
Before integrating any graphic resource into your workflow, a quick evaluation can prevent compatibility issues. Ensure you have the necessary software, typically Adobe Photoshop, to utilize the PSD file format effectively. While the package includes a standard image file for reference, the true value lies in the editable PSD. Check if your software version supports the specific smart object features used in the file; older versions of design software may struggle with newer blending modes or layer effects.
Additionally, review the license terms if you are using this for commercial client work. While many resources allow for broad usage in flyers, posters, and illustrations, confirming the rights protects you and your clients from legal complications. By taking these preliminary steps, you ensure that the tool serves your creative vision rather than hindering it. Ultimately, the goal is to enhance your productivity and output quality. With a clear understanding of resolution limits, smart object workflows, and contextual application, you can transform a simple text effect into a powerful component of your Halloween marketing strategy.